Pipe Robot

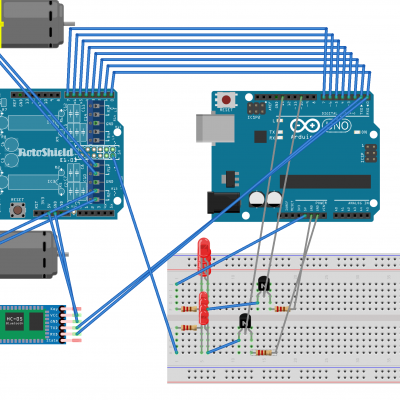
Uses an Android phone to command motors to moves the robot, which is all placed in a PVC pipe.

Engineer

Enlei

Area of Interest

Mechanical Engineering, Chemistry

School

Mills High School

Grade

Incoming Junior

Reflection

Overall, Bluestamp has been a fun and meaningful experience for me. It is the first time I have been exposed to electronics with engineering and I have learned a lot about it. I also learned basics of another coding language which is Arduino. The most exciting part is that staff allow you to design whatever you want, and they guide you through your problem instead of telling you the answer. Many times I ran into walls and broke stuff, and the guide online is basically useless because most of the parts I use are different, as well as unclear instructions. Despite all of that, with help of others and research, I was able to get through all the problems. This program has definitely inspired my future plan.

Final Milestone

here is my final code

library can be download at adafruit website.

For my Final Milestone, I built a chassis for my robot and assembled everything on it. I used 4in PVC pipes and two caps and mounted 2 DC motors and 2 sets of LEDs on it. I also cleaned up all of the connections and uses perfboard instead of breadboards. Then I made 2 wheels so it can move. Lastly, I created two metal bars with wheels attached at the end to limit the rotation of the bot because the center of mass is not low enough. I also switched my power source to a 6v battery pack because the 6v dc motors are easy to burn out with 9v batteries.  The biggest challenge that I have faced is when I finished building the chassis, the bot was more likely to spin itself instead of the wheels. First I tried to add counterweight to it, but the amount of weight required was too big for my tube to fit in, and it would likely to stall the motors. Instead, I added two sets of bars as stated above to prevent it from spinning too much. The next step is to connect my ultrasonic sensors to my board and create code for the robot to auto dodge obstacles. They are already mounted on both the front and the back of the robot.

First Milestone

The first Milestone of my project is the wiring of all my electronic parts and write code in order for me to control the robot with an Android app. The Android device sends a signal to the Bluetooth module whenever a button is pressed. The Bluetooth then communicates with the Arduino board with RX and TX lines. The board then sends a signal to the motor shield through pin 8, 9, 11, 13, which controls the motors to run. The board also sends signals to the LED board which turns them on and off. The whole system is powered by two 9v batteries. The biggest challenge I faced is figuring out which pins control the motors and figuring out what is the command output used to control them. The next step is to make the mechanical part of the robot and insert LEDs into the side of the robot.

Starter Project

For my starter project, I built a board for memory game. It includes resistors, which slow down the current flow to power the components. The capacitors are used to store electrical charges. The diode limits the current to flow in one way. One mistake I made is I did not insert a socket which protects the IC when there is an overflow of electricity, led to my IC vulnerable to broke. The IC is very important because it is a microcontroller that is the “brain of the board”. Lastly, I connected 3 1.5v batteries to the board. Then I tested to see if it works. The biggest challenge I faced is removing parts that are already secured to the board when they are placed in the wrong order.

Leave a Comment

Start typing and press Enter to search

Bluestamp Engineering