
Table of Contents
Final Project | Documentation | Final Milestone | First Milestone | Starter Project
Biography
My name is Ashar, I am a rising junior at the Albany Academies. I built the MintyBoost charger as my starter project and the RC Hovercraft as my intensive project. I chose to build a hovercraft because it peaked my interest in design as well as robotics. I also chose this project because I wanted to go through the trial-and-error process of programming. I hoped that this project would challenge me and also cause me to have an increased interest in engineering.
I have had experience in robotics and design before attending BlueStamp. Last Summer I built an obstacle-avoidance robot with a partner. We designed and 3D printed the chassis and did the programming through an Arduino. This taught me how to troubleshoot certain problems, we faced many roadblocks during the programming process. At times we thought that we couldn’t solve them, but eventually we found a way. I also attended a camp at ID Tech, where my team and I built a robot and programmed it to fight against others; ours won.
I enjoyed creating the mechanical build of the hovercraft. I had to change a majority of my design because I changed the fan that was being used for lifting the hovercraft. Other than switching fan sizes, the mechanical build went smoothly. The biggest problem that I faced was that my ESCs didn’t work. I had to wait for new ones. When my new ESCs came, I burnt one of them so I had to wait even longer. I also had to wait for a new motor to come in because the fan that I was originally going to used was fried. My experience at BlueStamp showed me what I can do with a minimal amount of help, and gave me confidence to start future projects independently.
RC Hovercraft
I build a radio-controlled hovercraft. One fan inflates the skirt and another fan moves the craft.


Exterior Interior
Documentation

Cad File: Hovercraft (This was made in SketchUp)

Electrical Schematic: Hovercraft (This was made in Circuits.io)
The piece labeled U1 is the receiver, the pieces labeled POLOLU are the ESCs. M1 is the lift motor, M2 is the thrust motor.
Final Milestone: Complete Build
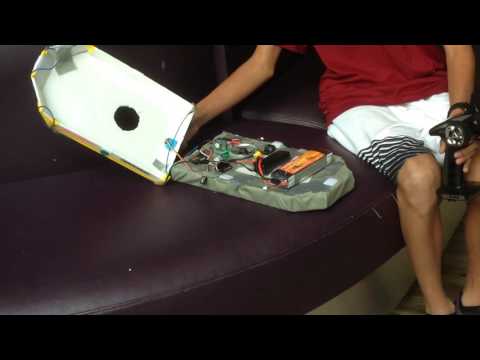
The battery is connected to the ESCs (electronic speed controller) which are connected to the receiver along with the servo. The battery powers the ESCs which powers the receiver and servo. The ESCs purpose is to change the speed and direction of a motor. The ESC that I am using for the lift can’t change the direction that the motor is moving, but the ESC that I am using for the thrust can. The hovercraft works with a three channel controller. One channel for the lift motor, one for the thrust motor and one for the servo. The lift is connected to channel three, which is a toggle switch, so I can’t control the speed at which the motor spins. I ran blue EL (electroluminescent) wire over the yellow electrical tape. The EL wire activates when an alternating current is applied to it. I chose the thrust motor mostly due to availability and timing.
The most challenging part was working with my ESCs. First I had to wait a few days for them to come, and then when they came I burnt one of them, so I had to wait for another, but the new one is much more capable than the one that burnt. The new ESC can handle 60 amps, as opposed to the previous ESCs that can only handle 18 amps. The hovercraft was drastically leaning to one side, so I cut a hole in the skirt, but since it was off center, it caused the hovercraft to spin. I taped up the hole, and put three small holes in a linear pattern down the middle. This didn’t solve the problem, I will continue to experiment on possible solutions.
First Milestone: Bottom Half of Build

The chassis of the hovercraft is made of 6mm depron. The skirt is made of nylon. The nylon works well for the skirt because it creates little friction and it is very flexible. I was originally going to use the motor being used as lift, for my thrust, but that motor would take a long time to arrive. I didn’t use my thrust motor as my lift because it was too long and it would stick out of the skirt. In order to activate the two motors I need ESCs. ESCs work with the brushless motors, they control the speed, and direction, and when plugged into the receiver, it enables the motor to be controlled.
It was challenging to pick a battery because there were many attributes of a battery that I was unaware of. My battery is a 3 S, 35C, 11.1V, 5500mAh Lithium Polymer(LiPo) battery. All three cell Lipos have an 11.1V range. The C rating stands for capacity, it is the maximum safe continuous discharge rate of a pack.The mAh (milliamp hours) determines the power capacity of the battery and the voltage determines how much energy the battery has. The mAh rating is literally how many milliamps the battery can discharge in an hour before it is out of energy.. The milliamps per hour determine how long the battery will last. You can determine how many amps can be continuously discharged by multiplying the Ah with the C rating. My battery can discharge 192.5 amps continuously. Also the ESCs that I got weren’t meant for hovercrafts. They were flight ESCs and wouldn’t work correctly with the motors, so I have to wait for new ones.
For my next milestone, I will build the second half of the hovercraft.
Starter Project
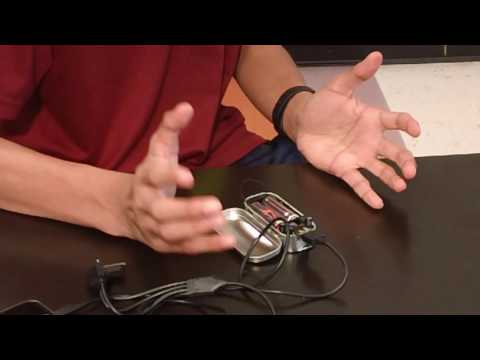
The MintyBoost is a usb charger. When nothing is plugged into the usb, the energy from the two AA batteries goes through the IC chip and into the power inductor. The power inductor stores the energy until something is plugged into the usb. The energy from the batteries and the energy stored in the power inductor power the usb. The capacitors stabilize the input and output voltages . The electrolytic capacitors can store more energy than the ceramic capacitors. The resistors restrict the flow of the current.
The usb charger that I originally used didn’t function. When I tested the MintyBoost with a different charger, I found out that the original charger didn’t work. The soldering iron was also bent which hindered the soldering process. I enjoyed this project because it gave me an overview into energy, and electronics.