Lunar Phase Clock
The Lunar Phase Clock is a clock that tells time like a regular clock, except for the fact that there is a 3D printed moon displaying the corresponding phase of the moon for the given date.
Reflection
Looking back at my BlueStamp experience as a whole, I can see how much I have grown. From first learning what LED (light emitting diode) stands for to incorporating RTC modules and completing complicated wiring set ups, I have learned so much. Although it was quite annoying when the instructors gave you twisted and incomplete answers, that method has made me more independent as a person. I remember how I was not sure whether I would like this program at first, but I am really glad that I came to BlueStamp because the program has taught me so much and I have truly furthered my skills in an engineering aspect.
Third Milestone
My third milestone was to complete a working Lunar Phase Clock. To do this, I had to wire all of my components alternatively into a perf board, which was a more permanent way to wire than a breadboard. I also had to figure out how to keep my NeoPixel strip flush onto the NeoPixel frame, which holds the smart LED strip in place without using glue since the only glue strong enough to hold everything in place was corrosive. I decided to use strong duct tape to hold the whole strip in place. Unlike with the glue, I could not put the tape behind the lights so I had to tape down the wires holding the lights together. To give a more professional look to the clock, I decided to spray paint the base and box holding the perf board, black. I then put all of my parts together and completed my project.
Second Milestone
My second milestone was to get all of the code working together with all of the parts. I had to adjust some of the code to display some things differently. I changed the code so that it displays temperature in Fahrenheit instead of the default Celsius on all the screens where it shows temperature. I had to go through the code and comment out a few lines because I was using NeoPixels but the code failed to mention that I also had to edit a line that came further down so I kept getting an error and I had no idea why. It turns out that you had to add a line of really advanced code so I had to go and find the line and edit it to meet my specifications. I also spent two days figuring out if my buttons worked or if there was something wrong with the code because two of my buttons seemed to be broken. It turns out that you just had to long-press the Menu button instead of a classic short-press to switch to the screen where the other buttons can actually be used. Another thing I added was the breakout board. It lets me connect and get power straight from a wall outlet instead of a USB adapter. My final milestone will be finishing my project. I already spray painted various parts of my moon clock so now I just need to put all the separate parts together and put all of my wiring onto a permanent board instead of a temporary bread board.
First Milestone
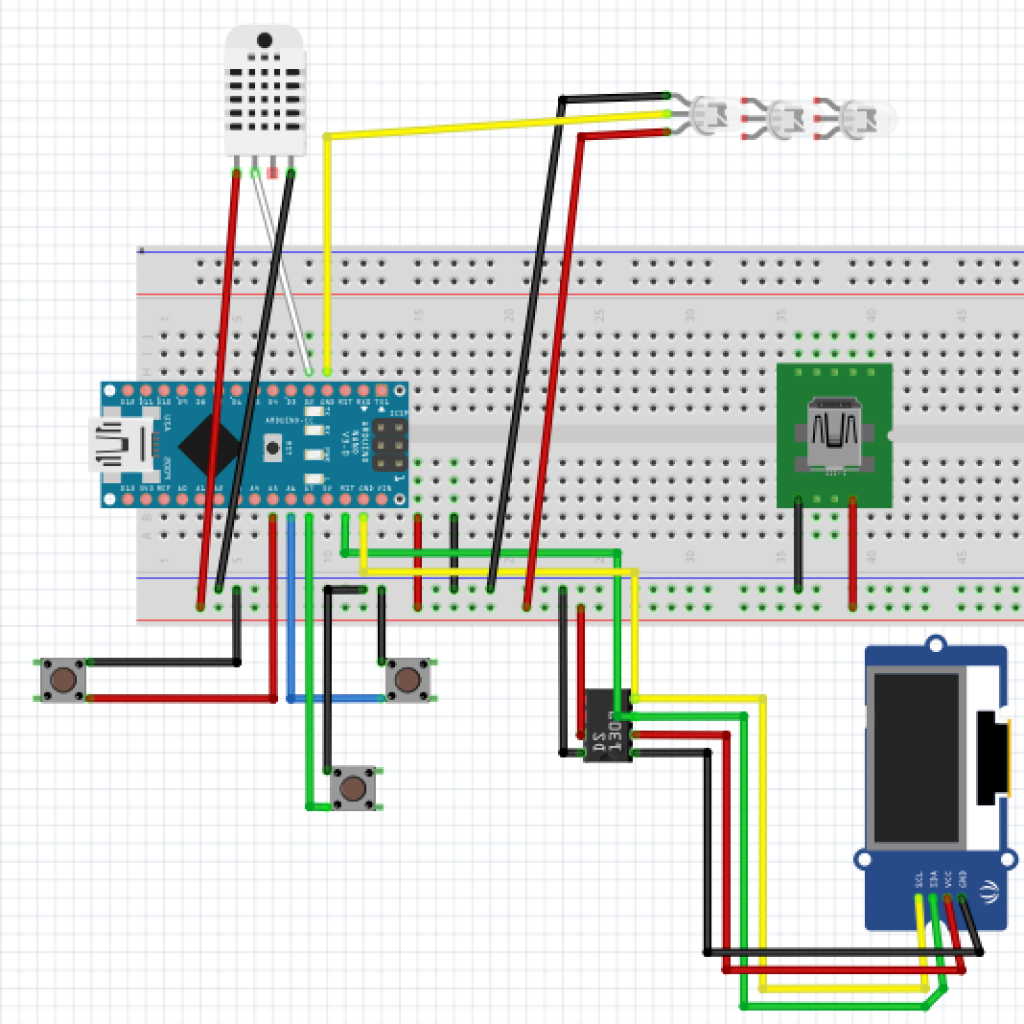
This is my first milestone for my main project, the Lunar Phase Clock. I have several components on my bread board currently and they all work when tested separately. The different parts are the Arduino Nano, the OLED display, the RTC (Real Time Clock) module, the DHT11, the buzzer & button, and the NeoPixel strip, which is several smart LED’s connected together. The Nano is what powers all of the components. The OLED is a light-emitting diode containing thin flexible sheets of an organic electroluminescent material used for visual displays. I will use it to display the time, date, and temperature in my project. The RTC is what keeps track of the time and date in my project. Although the Nano can do that, it needs to be plugged into a power source to keep the clock running while the RTC can be powered by a battery, so it keeps the time even while it is not connected to an external power source. The DHT11 measures the temperature and humidity of the room which will later be displayed onto the OLED display. The buzzer beeps when the button is pressed. This will be used to connect a sound sequence and meaning, as it connects the buzzer sound with a press of the button. The final component of my project is the NeoPixel strip. This is used to add visual aesthetics to the moon clock as it is used to light up different sections of the moon to correspond with the phase of the moon that day of the year. My second milestone will be to get all of these different components working together with a single Arduino sketch.
TV-B-Gone
My Starter Project is the TV-B-Gone. It is a simple device that turns off most tv’s when pointed at and activated. The device uses an indicator LED which flashes when the TV-B-Gone is on. Its brightness is limited by the R5 resistor. There is a ceramic capacitor and an electrolytic capacitor. The ceramic one is symmetrical and can be put in anyway, but the electrolytic one is polar since there is a plastic wrapping with a white strip down the side. It matters which way you put this one or the device will not work. There are four other LED’s which send the codes to the tv you point at. These are controlled by the NPN transistors and the microcontroller which stores the codes and turns the LED’s on and off.
Build!
If you’re interested in building this project you can find my code on my Github repository, and my materials and schematic down below.
Materials:
1) Arduino compatible Nano (Atmel ATmega328)
2) 0.96” OLED 128×64 with SSD1306 chip (only 4 pins)
3) Neopixel or APA102C (18 leds from a 60 pixel per meter strip)
4) Tiny RTC (DS1307 real time clock + 24C32 EEPROM)
5) DHT11 (temp and humidity sensor)
6) Pack of 10 pushbuttons
7) 3D printed moon parts
8) Hot glue
9) Duct tape
10) Heat shrink tubing
11) Soldering iron
12) Adafruit USB Micro-B Breakout Board
13) Micro usb to wall plug converter:
Schematic:
2) 0.96” OLED 128×64 with SSD1306 chip (only 4 pins)
3) Neopixel or APA102C (18 leds from a 60 pixel per meter strip)
4) Tiny RTC (DS1307 real time clock + 24C32 EEPROM)
5) DHT11 (temp and humidity sensor)
6) Pack of 10 pushbuttons
7) 3D printed moon parts
8) Hot glue
9) Duct tape
10) Heat shrink tubing
11) Soldering iron
12) Adafruit USB Micro-B Breakout Board
13) Micro usb to wall plug converter: