
Hello, my name is Alex and I am a rising senior at Denver School of Science and Technology in Green Valley Ranch. I signed up for Blue Stamp Engineering because I have always had a large interest in engineering. From this experience I gained a greater understanding of engineering as a whole, as well as interest and experience with specific items regarding engineering. For my intensive project, I created what I’m calling a “Smart Mirror.” I also used the raspberry pi 2 to default to a custom website in kiosk mode to display various widgets. I got the inspiration from here.
Blue Stamp Engineering allowed for me to solidify my future as an engineer. This program really opened my eyes to the fact that there are other students just as interested in engineering as I am, as well as there are people and instructors who not only wish to see you succeed, but who are willing and dedicated to helping you along the way. Within the program, I was exposed to multiple unique derivatives of engineering through guest speakers. Finally, one of the most important skills I learned while at Blue Stamp was problem solving and understanding that something might not the first, second, third, fourth, or even fifth time.

Milestone 3: Paint, Face-Plate, and Mirror Film
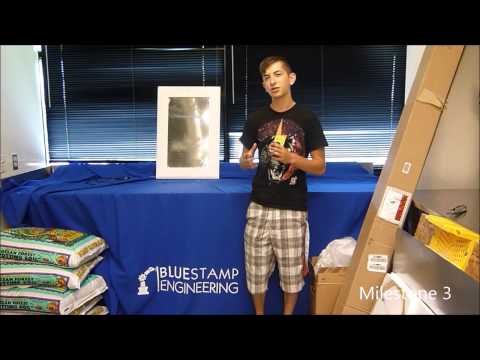
My third and final milestone focuses on the completed product. I connected the monitor and all of its components inside the wooden housing, in a compression fit from the Styrofoam blocks. Due to correct and precise measurements with the Styrofoam, no other form of mounting was needed for the monitor as the Styrofoam was able to hold the monitor in place when upright. I used trim molding to create what I like to call a ‘Face-Plate,’ which essentially converts a monitor in a box to an actual smart mirror. I measured and cut the trim at a 45 degree angle so that 1/2″ overhangs from the box and all pieces fit congruently when put together. Then, after cutting the piece of acrylic to the size I wanted, I roto-zipped about a 1 1/2″ into the trim and halfway down (about 1/4″). I then screwed and apoxied the acrylic to the trim so I could remove the entire Face-Plate as once piece; this was also helpful in positioning the trim pieces correctly. After counter-sinking all screws, I applied the one-way mirror film using glass cleaner, a credit card, and a spray glue. I was able to clean the acrylic then spray foam glass cleaner and evenly push all the foam out. Finally, I masked out the newly mirrored surface using painters tape and painted the completed project white.
*If I were to redo this process, I would paint everything and apply the mirror film at the end because the painters tape disrupted and pushed out the film.
Materials:
-Molding/trim
-Acrylic Plexiglass sheet
-One way mirror reflective film
-Spray paint
-Caulking
-Sandpaper
– Roto-Zip
-Glass Cleaner
-Spray Glue
-Credit Card
-Painters’ Tape
Milestone 2: Software, Monitor, and a Pi

My second milestone focuses more on the technical aspects of the project, primarily programming the raspberry pi 2. As I had stated before, I used a 23″ monitor, powered by a raspberry pi 2. When choosing a monitor, the larger the better. You ideally want a monitor that is also as thin as possible with the connections on either the sides or bottom not the back, a built in USB port/Hub, and a HDMI input; however, if the monitor does not have a HDMI input, a DVI input would be sufficient as you can get a DVI to HDMI cable or adapter. Also, if the monitor does not have any of the other features, you can work around that with a different case design and/or by powering the Pi through a micro-USB to USB cable plugged into a wall adapter.
The goal for the webpage is to have: a comment, weather, weather forecast in advance, time, date, and a news feed. I uploaded operating system “Raspbian” into my Pi as it would yield the best experience later on. I used a standard Ethernet connection as I was unable to get a wifi adapter to work. The tutorial I followed (located Here) covered most steps in some detail except how to create the website, which will be ran behind the one-way mirror in full screen. To do this, I converted my raspberry pi into its own Apache server, then create a web-page from that server onto the actual Pi so that some features work if not connected to the internet. I was then able to upload to the server after entering this command ‘sudo nano var/www/index.html’ to edit the webpage. You can find my complete code here: Magic Mirror Code Complete
Once I had the webpage working, I needed to set up SSH on my Pi. After I got SSH working and I was able to access my Pi remotely from my computer, the next step was to change the rotation to portrait, make it so the pi automatically boots the webpage in ‘Kiosk’ mode (full screen that you cannot alter), then disable the pi from turning off the screen after an extended period of no use. You can change the boot up settings with this command ‘sudo nano /etc/xdg/lxsession/LXDE-pi/autostart’. This location can change based on the Pi and its firmware. When choosing the webpage, I chose to use the Pi’s IP address as the domain instead of ‘localhost.’
Materials:
-Raspberry pi 2
-Computer monitor
-Various cables
-Time
Milestone 1: The Casing
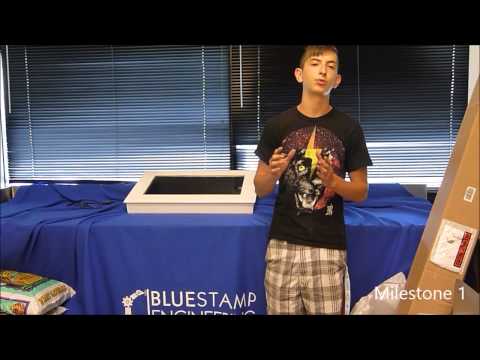
My first milestone displays the housing required for the monitor to rest in. The entirety of the “Smart Mirror” relies on a computer monitor and a raspberry pi 2, so having a correct housing for the display is essential. The raspberry pi is essentially a compact computer the side of a credit card. The main portion of the casing is comprised of 1″ x 2.5″ pieces of wood and about 1/4″ piece of plywood. When choosing the wood for the outer rim of the casing, I concluded 2.5″ would be sufficient as 2″ could possibly be too shallow for the monitor and pi, but 3″ would potentially leave too much room between the monitor and the acrylic which I added later.
I used a 23″ computer monitor, so I thought inner dimensions of 16″ x 25″ x 2.5″ would allow for the monitor to fit comfortably within the case, give room for potential error, and give room for the Face-Plate, which I will talk about later. I put 1″ x 1″ x 2.5″ pieces of extra wooden slabs on all four corners of the casing to not only adding stability, but a unique, professional design. Finally, I added a piece of 1/2″ plywood along the length of the case about 1″ further in, in order to make room for the pi, add cable management, and help center the monitor (Image 1). To help center the monitor even further, I added multiple pieces of Styrofoam around the inner perimeter of the casing. Each side has a different thickness measurement, so that when the monitor is inserted inside, the monitor will be perfectly centered (Image 2).
*Notice: All measurements are dependent on monitor size.

Image 1

Image 2
Materials:
-(2) 16″ x 1″ x 2.5″ wooden slabs
-(2) 25″ x 1″ x 2.5″ wooden slabs
-(4) 1″ x 1″ x 2.5″ wooden board extra pieces
-18″ x 27″ x 1/4″ Plywood
-25″ x 2.5″ x 1/2″ Plywood
-Styrofoam
-Wood Screws
-Wood Glue
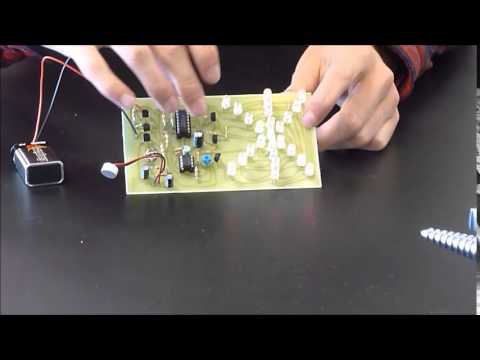
Starter Project
For my starter project, I chose to create a Light Organ. This project was eye catching to me as I thought the idea of lights lighting up in reaction to music would be an interesting feat to accomplish. I also chose this starter project to fancy my interests so I could create a more interesting intensive project. The light organ transforms sound frequencies into electronic pulses to be displayed in an LED light show. From this project, I gain a lot of experience in soldering and i gained a large amount of knowledge with transistors, capacitors, IC’s, and resistors.